Showing posts with label holiday. Show all posts

Tuesday, March 17, 2015

Spring Craft Blog Hop - Easter, Mother's Day, and Spring

Welcome to the third in a four-part spring craft blog hop challenge for the spring season! This hop will run from March 18th - May 25th and will be the longest and biggest of the hops. We're challenging you to create a craft project that reflects Easter, recycled crafts, Earth Day, Mother's Day, Teacher's Day, May Day, Cinco De Mayo or a General Spring theme. Please join us in this challenge and link-up your crafty creation at the bottom of this post and have it shared on 19 blogs!

I'm so happy to be a part of the Spring Craft Blog Hop, be sure to check out my Patchwork Polka Dot Easter Eggs below for a quick and easy craft to get you in the spirit of Easter. Be sure to visit all of my fabulous co-hosts to see how they shook out the last of winter and welcomed spring!
 
Come link up your crafts at the Spring Craft Blog Hop - running from March 18 to May 25, get crafting and decorating ideas for Spring!

Meet all 19 hosts!

Each host will be sharing their own craft to kick off the Spring Craft Blog Hop challenge, so make you visit each host to see their fabulous creations!

Friday, March 13, 2015

Signs of Spring from the #SCBH2015, Favorites from week 4

There is still time to link-up your St. Patrick's Day crafts to the Spring Craft Blog Hop! This is the final weekend for the current Spring Craft Blog Hop! The current Hop closes on March 17, and will re-open on March 18th with a new link-up including Easter crafts and continuing on the general spring theme. Thanks to My Pinterventures for organizing and all the other hosts for making this link-up party so successful!

Lots of shamrocks in this Signs of Spring Round-Up, featuring crafts from the #SCBH2015


I promised I would feature more St. Patrick Day crafts this week, and it wasn't hard to find some amazing projects. Creating these round-ups has been a breeze, because I already start out with great content linked up thanks to all of you! Lots of shamrocks in this round-up today, to bring you plenty of Irish Luck!

Thursday, March 5, 2015

St. Patrick's Day Printables for a Mini Gallery Wall

St. Patrick's Day is less than 2 weeks away, so it's time to get decorating, right? I have seen some great decorating inspiration on the Spring Craft Blog Hop, from all the co-hosts and the almost 100 entries so far. I have always wanted a fun gallery wall full of photos, printables, and other decorative things, so for St. Patrick's Day I though I would start one! I bought a variety of white frames in 8x10 and 5x7 sizes. I created a couple of printables, and finished the look off with green polka dot scrapbook paper and a swatch of themed fabric.

Make a Mini Gallery Wall for St. Patrick's Day using printables, fabric remnants, and scrapbook paper. Get 3 free printable Irish Blessings here:

I plan on changing out the printables and fabric with the seasons, and eventually they will be filled with family photos, so I felt like I will get a lot of bang for my buck that I spent on the photo frames. Since it's March, I went with green and shamrocks as my uniting factor. I was lucky enough to have the scrapbook paper and fabric already, so the only thing I had to buy for this project was the photo frames.
 
A collection of free printables, fabric remnants, and colorful scrapbook paper makes a fast, easy and cheap gallery wall project for St. Patrick's Day
 
A collection of free printables, fabric remnants, and colorful scrapbook paper makes a fast, easy and cheap gallery wall project for St. Patrick's Day


Friday, February 13, 2015

Valentine's Day Ultimate Round-Up: What LOVEly Ideas You Have!

Valentine's day is tomorrow. Whether you love it or hate it, it's here (cue the dramatic music!).  As a blogger, Valentine's day is great for sharing themed crafts, recipes, and fun activities with the kiddos. Just search Pinterest for Valentine's day and you will be bombarded by pink, red, and white crafts, cookies... you name it! I've decided to gather up a few (ok, like 20) ideas that I have seen this season and share them with you!

Monday, February 9, 2015

Strawberries and Cream Rice Krispie Bars

Strawberries and cream rice krispie bars are the ultimate no-bake dessert for Valentine's Day. Not only are there only 5 ingredients, but these can be made in less than 15 minutes. They contain no artificial colors or flavors, making these treats fun and kid-friendly! Freeze-dried strawberries give these treats their pink color and an intense strawberry flavor.

 
Sweet, delicious and naturally red and white, strawberries and cream is the perfect pairing for Valentine's Day. The combination of freeze-dried strawberries and white chocolate chips are added to the classic recipe of rice krispie treats to create this festive dessert. To make it super-special and a little extra decadent, drizzle some chocolate over the top. You could stop there, but I tossed on a dash of colorful sprinkles to add to the Valentine's theme! Of course, if you are trying to avoid artificial colors, avoid the sprinkles.

Tuesday, February 3, 2015

Sweet(heart) Welcome Sign #SCBH2015

This post is part of the first Spring Craft Blog Hop featuring Valentine's day and Mardi Gras crafts, DIY, and décor! We would love to have your posts added to our link up. Link up runs through February 17th, and is shared on 18 wonderful blogs.

When I think of Valentine's day, the first thing that comes to my mind is candy hearts and chocolate boxes. What can I say, I love food! But of course, I'm trying to watch what I eat to lose some extra weight, so I won't be enjoying TOO many sweets and treats this Valentine's Day. What I will be enjoying is this sweet heart-shaped welcome sign, reminiscent of everyone's favorite 1,000 calorie box of goodies.


Thursday, January 29, 2015

Spiced Rosemary Candied Almonds

Sticking with game day snack theme, these Spiced Rosemary Candied Almonds are the perfect snack to enjoy with company (or not) while watching sports, hiking, or just kicking back. A few staple ingredients is all you need to create a sophisticated snack that will please just about everyone. These Spiced Rosemary Candied Almonds aren't just great for game day. Try them for snacking on mid-day, instead of reaching for the chips or cookies. Package them up, they make perfect gifts for holidays, housewarmings, and hostess gifts.


Don't think you need to stop at almonds, though. Try making Spiced Rosemary pecans, walnuts, cashews, or a mixed blend. Once you are comfortable with the method, the possibilities are unlimited! Make these ahead and store for up to one week in a cool, dry location. These make for excellent additions to a cheese platter, or toss in some dried cranberries for a tempting fruit and nut blend. Instead of reaching for pretzels or the chip and dip, grab a handful of these nuts and snack smarter.

 
Spiced Rosemary Candied Almonds
Get printable recipe here


Ingredients

  • 1 pound raw almonds
  • ¼ c sugar
  • 1 egg white
  • 2 tsp dried rosemary, finely chopped (3 sprigs)
  • 1 tsp kosher salt, plus pinch
  • ¼ tsp cayenne pepper

Tuesday, January 20, 2015

Spring Craft Blog Hop - Valentine's Day and Mardi Gras #SCBH2015

Welcome to the first spring craft blog hop challenge for the spring season! We're challenging you to create and share a Valentine's Day, President's Day, or Mardi Gras craft tutorial. This hop will run from January 20 - February 17 and you can share your creations in the link-up at the bottom of the post.
Spring Craft Blog Hop

Meet all 18 hosts!

*Please follow your hosts on at least one or more social media platforms of your choice. Let us know you're following from #SCBH2015*
Spring-Craft-Blog-Hop-1
Spring-Craft-Blog-Hop-Line-2
Spring-Craft-Blog-Hop-Line-3
Spring-Craft-Blog-Hop-Line-4

Grab a button and help us spread the word!
My Pinterventures

Valentine's Day Sweet(heart) Welcome Sign - part one

 
I am so happy to be a part of this Spring Craft Blog Hop! Today, I am sharing the first part of my Sweet(heart) Welcome Sign for the front door or entryway. This heart with a sweet stenciled message comes together in an afternoon, and can be hung up on the front door, in an entryway, or on your mantle. I will show you how to hang this sweet sign soon, so don't miss out!

Monday, March 17, 2014

Emerald Isle Jigglers

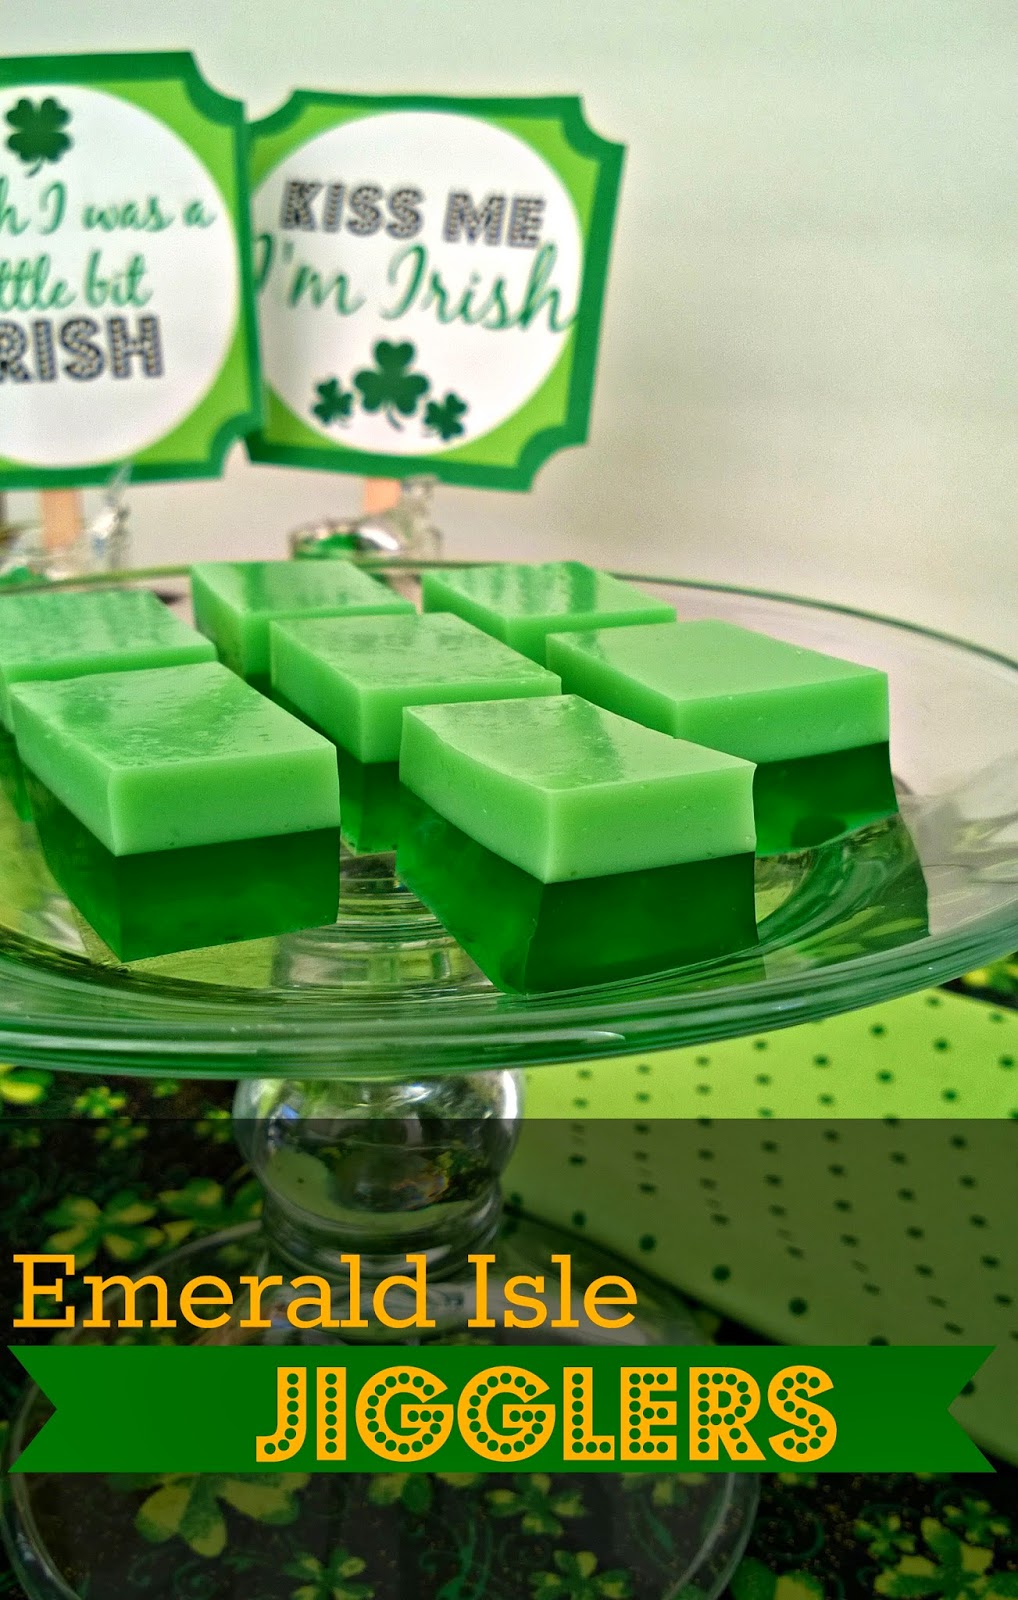
Jello is definitely a treat for my children, since I try not to make it often. I think these Emerald Isle Jigglers are the perfect little way to celebrate St. Paddy's Day, and they couldn't be simpler.
 

Emerald Isle (Lime Jello) Jigglers
Makes one 9"x13" pan

You Will Need: 
3 large (6-oz) packets of lime Jello
1 1/4 cup sweetened condensed milk
Boiling water
Cooking spray
9x13 pan

This is a two-step process, but each layer is equally simple. The first layer is lime Jello Jigglers. Let it set and add a creamy Jello layer with the addition of condensed milk. This was such an easy dessert, my two-year old helped make the first layer before we put him down for bed. I finished the second layer before I went to bed and let it set up in the fridge overnight. (Hence no pictures of the step-by-step process, but it's so easy, you probably don't need them!)

For the bottom layer: Add 2 packets to 2 1/2 cups of boiling water. Stir and let dissolve for 3 minutes. Spray your 9x13 with cooking spray, then carefully pour your Jello in. Pop any bubbles with a toothpick and place in your fridge (uncovered) to set up for 1-2 hours.

For the top layer: Add 1 packet to 1 1/4 cup boiling water. Stir and let dissolve. Pour in 1 1/4 cup of sweetened condensed milk (I eyeballed it from a 14-oz can). Stir gently to combine. Slowly pour on top of the first layer, popping any bubbles. Return to fridge and let set 4-5 hours, or until really firm.

To serve, set your pan onto a hot towel for a few minutes, and slice with a sharp knife. Alternatively, you can cut with festive cookie cutters for even more St. Patrick's day cheer!

St. Patrick's Day Kiss Party Favors

Happy St. Patrick's day! I have been having fun these past few weeks putting up a few decorations and making sure I have something green to wear. I made these little favors for fun, but you could use them to decorate a mantle or surprise your kids/spouse with a bit of chocolate goodies. These would also make a cute place card/favor for hosting a dinner party. I had all the supplies on hand, making this a no-cost craft (my favorite kind!).


First things first, the supplies.
  • Tall shot glasses: I bought these at Target in the dollar section a few years back. Try your local dollar store, thrift store, or even a restaurant supply store for inexpensive shot glasses.
  • The printable: if you are following this blog you might recognize these from my St. Patrick's day photo props. They are the perfect size for this!
  • Craft sticks, glue, and a bit of tape: to put the printable "on a stick"
  • Hershey's Kisses and mini M&Ms: I simple separated the green ones out, or you could pick up a bag of green M&M's from your local party store. Really, any small green candies would work in this.
1. Stack 3 Hersey's Kisses inside your shot glass.
2. Pour some green M&M's on top, gently tapping to get them all the way to the bottom.
3. Stack another 3 Kisses on top.
4. Pour in another handful of M&M's, tapping them down a bit.
5. Add your printable on a stick, and there you have it. Super simple, super cute party favors!


Wednesday, March 5, 2014

Decorating for St. Patrick's Day: Photo Prop, Free Printable

With St. Patrick's Day coming, I think most people are a little "green" with envy. But why should those with Irish blood have all the fun? Here are two printable photo props so we can all have a little fun! I got the inspiration for these from last month's Valentine's Day on a Stick.
 
Cut them out, fold them over a craft stick, and get snapping! Or use them to decorate around your house, maybe stick them in a potted plant, or in a candy dish on the mantle, or hide them somewhere for that special someone to find!


Monday, March 3, 2014

Decorating for St. Patrick's Day: Lucky Shamrock Bunting

Wow, what a whirlwind weekend! My youngest turned 2 years old, we had family come for a visit. Since we will be having a joint birthday party at the end of the month for S and Big Brother, we just had a low-key birthday dinner with cupcakes for dessert Saturday night. This weekend, Elder Scrolls Online hosted a beta event, so I stayed up a bit later than usual. Yes, I play video games on occasion. More like I try to play video games but at the end of the day, sleep usually wins out.

 
I also created this bunting to decorate for St. Patrick's day, using items I had on hand. Remember our marble painting from last week? I told you I was going to use them in a St. Patrick's day craft, so here they are!

Our green and gold marble painting were perfect for this. They got a little curled after they dried, so I flattened them out under a stack of heavy books overnight. I created a template from a quick search on Google images and traced it onto some cardboard. I punched holes in either side, and strung it up on cream colored yarn. I made the bunting to fit my fireplace, but then moved it to the windows in our breakfast nook to keep little hands off of it. I made two smaller bunting for the small windows using a similar template. The length of the larger bunting is 56", the smaller ones are 26". I hung them all using small Command hooks, that way I didn't have to use unsightly tape or drill holes in the wall.


It is really difficult to take pictures of my breakfast nook during the day since it is completely backlight. Here you can see what the finished product looks like, as well as see the two smaller buntings that I added to the side.

I love the way it turned out! It was a lot of tracing and cutting (17 four-leaf clovers and 10 three-leaf), but otherwise a simple craft to take an afternoon on, and a great way to showcase my son's art!


Saturday, February 15, 2014

Play with (Paper) Conversation Hearts

 
I hope all of you had a fabulous Valentine's Day. Mine started out with making heart-shaped pancakes for my family, included plenty of fun activities and cookie baking with my boys, and ended with enjoying dinner and dessert with family at my mom's place. S and I had so much fun playing with our paper conversation hearts yesterday! I wish I could have had 3 more hours in a day so I could have written and posted this yesterday, but here it is now.

So cute! Felt stickers from Michael's
I set out a blanket and placed his Valentine's Day box (really an up-cycled tissue box wrapped in red paper and tied with a white curling ribbon bow). I filled the box with the conversation hearts and cute felt stickers that fit the Valentine's Day theme.
At first, he didn't know what to make of them, and gave them a taste, but quickly decided that they were not for eating, unlike their candy counterparts. A few got mangled in the process, good thing I made a bunch! I read the phrases on each heart to him as he pulled them out of the box. He pointed out some letters that he recognizes. At a few weeks shy of two, he recognized and says B, C, D, E, K (well he can't say it yet, but makes the sound) M (pronounced "num" as in m&m's), N, O, and S. This was also an exercise in taking out and putting back in. He soon found that if you turn the box upside down and shake, things fall out quicker.
After we got through a bunch, he decided that they were pretty good for throwing in the air, so he tossed and I gathered them back up. At this point the blanket got tossed to the side, revealing my carpets that desperately need to get replaced (with hardwood, please). As I was looking at the scattered hearts, I got another idea.
 
 
I lined up the hearts in a wavy line, about 4-6 inches apart and asked S to walk along the line. He thought is was so fun stepping from heart to heart. If I was to do this activity again, I would probably tape the hearts down to the carpet to keep them in place. They did get kicked around a bit which meant I was constantly replacing them on our line, but it was still fun, and a good "following directions" lesson. I changed the pattern a few times, making the line straighter and curvier, and even tried a heart, but at that point he was bored with the hearts and moved on to trying to tear the paper off the Valentine's box, and I knew that the activity was over.


We picked up our mess, putting the hearts in a bag and the felt stickers in another. We didn't actually get to play much with the stickers, so I will put them with my art supplies for next Valentine's Day. The hearts I put with the rest of our sensory materials. Most of them lasted through our play session. I'm hoping to revisit with them another day, as they could be used in more applications, like learning colors, patterns, counting, etc.. In all, I think we were occupied for about 35-40 minutes. For an active boy, that is a good amount of time.
 
The Valentine's box, on the other hand, didn't end up in the best shape, and so we let it retire to the recycling bin. 

Thursday, February 13, 2014

Paper Conversation Hearts for Toddler Play

I have a confession to make. Conversation hearts are one of my favorite seasonal candies. So, of course, when Valentine's Day rolls around, I buy more than a few boxes of them. This year I controlled myself, only buying 8 boxes. I was inspired to make paper conversation hearts with personalized messages for my youngest. We could still enjoy the novelty of conversation hearts, without the sugar-high. I was excited to see that they added blue to the mix this year, so I made my hearts in the same colors. The nice thing about this craft is that it didn't cost me any money, as I had all the supplies on hand. 


Using heavy card stock, I folded three sheets in half to be able to make the six colors. In my stash of acrylic paints, I found pink, yellow, red (to mix with yellow to make orange), green, blue, and purple. I mixed a dime sized amount of paint with about a teaspoon of water to create a vibrant watercolor effect. I then used a foam brush to paint my paper, leaving some lighter and darker streaks. I then let it dry overnight.

In the morning they were dry, but the edges had started to curl, so I placed the three sheets under some heavy cookbooks for the day. By 4 pm, they were much flatter, and I could start cutting my hearts. I made a heart template out of another piece of card stock, and started tracing hearts on the backside of my pages. And then cut, and cut, with a sharp pair of scissors until they were all cut out. If I had a large heart-shaped punch, my job would have been easier, but I endured.

With my hot pink pen in hand, and a box of candy conversation hearts as my muse, I got to work writing messages of love on my hearts. As this is a lesson in early literacy, I created a mix of standard messages and more personalized ones, like "MOMMY/DADDY LOVES YOU" "MAY I HAVE THIS DANCE?" and "CUTIE PI" plus my pet name for him "LOVEBUG".


If you liked this, also check out


Wednesday, February 12, 2014

Valentine on a Stick Craft and Free Printables

These cute valentines on a stick are perfect to put anyone in the Valentine's day mood! You can use them to decorate your candy bowl, or add a small touch to a bouquet. Make a lot and hand them out to friends and family. Slide a lollipop inside, instead of using the craft stick, for a sweet something extra, or attach a bag of Kisses with a bit of curling ribbon for some whimsy.

Happy Valentine's Day!
Renee


Step One: Print. Each template comes with 3 copies on a page, so you can make lots of valentines!
Step Two: Cut out the template around the edges
Step Three: Fold along the line. This is your back and front.
Step Four: Tape a craft stick on the back (white side) of one half.
Step Five: Glue together and let dry. You can now pass out your valentines, or use them as decorations.

You can share your Instagram pictures with me using hashtag #creativemamamessyhouse. I look forward to seeing your creativity!