Monday, March 31, 2014

March Wrap-Up and Recap


The end of March marks my first full month of blogging for Creative Mama, Messy House. How exciting! I joined a blogging group, decorated for St. Patrick's Day, and added some great recipes that have gotten a lot of positive response.


On March 15th, I joined the Blogging Bunch Facebook group and started the Blogging Bunch's 31 Days to Build a Better Blog challenge. It is based on the book 31 Days to Build a Better Blog by Darren Rowse. It feels so wonderful to have a group of bloggers that I can rely on when I have questions, and who can give me honest feedback when I ask for it.
 

Creative Mama, Messy House got a Facebook page of its own, you should visit! There add photos and crazy toddler antics that you might not see on the blog itself. Also, be sure to find me on Instagram for sneak-peek photos before they hit the blog! I passed my first 1,000 page views last week! I spent the weekend improving the overall look of my blog. I updated my header to be easier on the eyes, as well as added social media buttons. My little blog is starting to look so grown-up!

What happened this month

This month started full-force with my S-Bug's 2nd birthday. We made these Carrot Cake Cupcakes from Sweet Pea's Kitchen topped with vanilla buttercream. He was such a cutie-pie when the time came to sing Happy Birthday.

I focused a lot of my creative time making decorations for St. Patrick's day.


What did I cook this month? While I was cooking everyday, I added a few of my top recipes to share with you. My local Farmer's Market will be open twice a week starting April 24th, so I am hoping to add more recipes for you in the spring and summer months.


We welcomed Spring with open arms and up-cycled a mirror into a pretty springtime chalkboard, perfect for our Easter mantlescape (to be revealed mid-April). 


Looking to next month

I have more Easter crafts planned for the month of April, as well as a new series starting. Look for "Farmer's Market Thursdays", where I will spend $20 at my local Farmer's Market and create recipes using my finds. Talk about eating seasonally and locally!
 
As always, I love hearing from my readers. Feel free to drop me a comment or tag @creativemamamessyhouse on Instagram. I would love to see and hear about your creativity!

Thursday, March 27, 2014

Quick Fix - Picture Frame Hanger


The other day I up-cycled a mirror into a really cute chalkboard. I have no idea what it's original use was, but it was too small for any practical purpose. The frame is about a foot square, with a small 4" mirror inside. It didn't have any hardware to mount it to a wall, so I made my own! Using some craft wire and two thumb tacks, I rigged my own picture hanging mount so I could hang my new spring chalkboard.


As you can see in the image, I pressed a thumbtack into the wood on either side of the mirror. You might need to hammer them in gently to get started, depending on how hard the wood is. Then I wrapped the wire once around each pin and cut it, leaving a 2-inch tail. I wrapped the tails around the thumbtacks to secure the wire without needing to make knots.

I now have a cute decor item that I made for just a few dollars. I put it up in my kitchen so we can see it when we walk in. Since I hung it using a Command hook, I can easily move it around the house. I hope it will become part of my Easter mantle. I'm working on some other Easter decorations to go with it, including an Easter egg tree and a bunting. I have so many ideas up on my Easter Fun Pinterest board to choose from for inspiration.


My chalk pen came in yesterday, and let me tell you, I like it much more than writing with a stick of chalk. My handwriting is still pretty bad though. If you want to see really bad, you should see me try to write in chocolate on a cake...

I do not recommend using this technique on anything heavy. My frame weighed less than a pound, and did fine with this method. if you had a picture hanging kit, it would probably be better for anything larger or heavier. 

Wednesday, March 26, 2014

Easy Weeknight Dinner, Roasted Shrimp and Broccoli

After running around after a toddler all day, I am tired! While he is napping, I am catching up with social media, editing photos, and preparing material for the blog. Today, I wanted to showcase this simple supper that can be made in just about 20 minutes. Last week, Jenna from A Savory Feast posted a great link on how to roast broccoli, which reminded me about my recipe for Roasted Shrimp and Broccoli.


This recipe is simple enough for a weeknight supper, but impressive enough to serve at your next get-together. Because all the cooking is done in your oven, it can be doubled or tripled, and still cook within the same window of time. This dish is super healthy too, with lean shrimp and vitamin-rich roasted broccoli. This dish gets its flavor impact from lemon, red pepper flakes, and a drizzle of good-for-you olive oil. I serve it over orzo with a sprinkle of feta cheese and pine nuts to make it a complete meal that satisfies everyone.


Roasted Shrimp and Broccoli
Serves 4

Ingredients:
  • 1 pound raw shrimp
  • 1 pound broccoli, about 2 crowns, cut lengthwise to utilize both stem and florets
  • 1 lemon
  • 1/2 teaspoon crushed red pepper flakes
  • Olive Oil
  • Salt and Pepper, season to taste
A note on shrimp: If you can find fresh whole shrimp (yes, head-on) they will give the dish even more flavor. The best I can do at my local store is frozen shell-on, tail-on. I clean the vein out, and then roast them without peeling. Peeled, deveined shrimp will also work in this recipe.

Directions:
  1. Preheat oven to 425. Toss shrimp and broccoli with a good drizzle (2 tablespoons) of olive oil, salt, pepper, zest and juice of one lemon, and red pepper flakes.
  2. Lay out on a baking sheet, shrimp on one side and broccoli on the other. If you are making a larger batch, you can put broccoli on one and shrimp on another. There is a good reason for this step, I promise.
  3. Roast for 13-15 minutes. At this point, remove the shrimp and check the doneness of the broccoli. I prefer my broccoli to be very al dente, so I take mine out at this point. If you like a softer roasted broccoli, leave it in for 5-10 more minutes. If you separated your shrimp and broccoli, it is very quick to take off the sheet pan while leaving your broccoli put.
  4. When the broccoli is done to your liking, combine the shrimp, broccoli, and any juices remaining on the sheet pan, and serve. Yum!
Broccoli and shrimp on sheet tray, separated, before roasting

Printer Friendly Version

Monday, March 24, 2014

Spring Chalkboard from an Up-Cycled Mirror


I had family come over yesterday for a barbeque, so I have been cleaning my house trying to make it look halfway decent. With a very active toddler, there is only so much I can do during the week. I managed to take some bags and boxes to Goodwill to donate, but before I did, I rummaged through them one last time, just to make sure that the kids had only thrown donate-able items and not broken toys or clothes with holes in them.
 
I'm glad I did too, because I found this gem in there! I don't know where this mirror came from, or what its purpose was, but I had previously set it aside "to do something with" years ago, and put it in the Goodwill box when 6 months or so had passed. I'm glad I discovered it again, because this time I had a purpose for it!
 
I made this cute little chalkboard, perfect for dressing up the mantle or entryway!
 
Here was my inspiration:
$2 Trash to Treasure Chalkboard by Making Home Base


Mirror
White acrylic paint or primer
Chalkboard paint-See Note 
Mod Podge
1 square of scrapbook paper (I went to Michael's and got 1 for $0.59)
Brushes
Painter's tape
 
Not pictured:
Rubber scraper for smoothing out air bubbles in the paper
X-acto knife for trimming the paper
Sandpaper for smoothing the edges of the paper after trimming
 
Note: I recommend finding chalkboard paint specifically for use on glass or glazed ceramic. I used the Martha Stewart chalkboard paint, and it was difficult to use on glass. Live and learn, I will use it for other chalkboard applications in the future.
 
1. Prime the frame using primer or white acrylic paint. I covered the mirror with painter's tape first.
2. Add the chalkboard paint. Follow the directions on the bottle. Most will need to let cure for at least 24 hours after it is dry before using chalk on them.
3. Time to Mod Podge. I applied Glossy Mod Podge to the back of the scrapbook paper, then smoothed out any bubbles with a rubber scraper (found at your restaurant supply store for $0.79).
4. I used the X-acto knife to cut out the mirror/chalkboard and to trim around the edges. This way I didn't have to be as accurate when applying the scrapbook paper.
5. Apply two coats of Mod Podge to the top to seal everything. Once dry, lightly sand the edges.
6. Your new chalkboard is now ready to be part of your Spring or Easter décor!


This was my first attempt using chalkboard paint, I definitely learned some things! I will be decorating my mantle for Easter in the upcoming weeks and I plan to feature this. As you can see, I am not the best artist, so my stick figure people and fried-egg flowers will just have to do!
 
I remembered I don't like writing in chalk (memories of grade school writing on the blackboard). I have ordered a chalk pen that I hope will make writing easier.


Friday, March 21, 2014

Happy Spring! My favorite sights, sounds, and smells of spring


Yesterday officially marked the first day of spring. Here, it has felt like Spring since February. We have been spending loads of time at our local parks playing and having picnics. I found a great picnic blanket on Zulily for $24.99. It has a waterproof side to keep bums dry on damp grass, and comes with its own carrying tote for easy transportation. We're pretty certain it will get lots of use over time!

Springtime signifies rebirth and newness. Days get longer and the temperature rises; spring is a time to get outside and enjoy life. I have family coming over on Sunday for a barbeque so we can celebrate our sons' birthdays, both of them are March babies. Our daughter (6th grade) lives out-of-state with her mom during the school year, is also a March baby.


Here are some of my top 3 sights, sounds, and smells of spring, in no particular order.

Sights: 
  • Flowers budding on trees: Spring buds means summer fruit! While we are still months off from having fresh fruit from the backyard, seeing the little green plums just makes me all smily inside!
  • Baby animals: Spring is the season for babies! We love watching for calves on our way to Grandma's house, and seeing the ducklings at the park.
  • The first strawberries at the Farmer's Market: While we are still enjoying all the citrus the market has to offer, strawberries are beginning to make an appearance, yummy!

Sounds:
  • Birds chattering, and baby birds cheeping: I keep a squirrel-proof bird feeder by my kitchen window to see and hear the birds go by. My mom's barn is aflutter with birds swooping in and out.
  • Kids playing outdoors: The weather warms up and kids are more willing to play outside. The community park gets more visitors, so more kids and opportunities for my kids to know their neighbors.
  • Rainstorms: I love the sound of rain on the window, snuggled up indoors with some hot tea, or splashing in puddles in a pair of rainboots!

Smells: 
  • Orange Blossoms: Our neighbor's yard is full of citrus trees, and the aroma of the orange blossoms is wonderfully intoxicating.
  • Fresh Dirt: Spring is the season for planting! I find therapy in gardening, digging in the dirt, weeding, adding new color to the front yard and adding new vegetables and herbs to the backyard.
  • Barbeque smoke: Warmer weather means more cooking outdoors. I use an old-fashioned Weber kettle grill, the same kind my dad taught me on when I was a kid.
I want to hear from you! What are your favorite sights, sounds, and smells of springtime that you love or are looking forward to experiencing? What reminds you that warmer days are on the way?

Tuesday, March 18, 2014

Spinach, Kale, and Garlic Pizza (and tips for making pizzas at home)

St. Patrick's day is over, are you sick of green yet? I hope not, but if you are, this spinach, kale, and garlic pizza might just change your mind. A pizza with a full serving of vegetables, you can't feel guilty about eating that! With kale featured in both the pesto and on top of the pizza, you get a double dose of super greens. Just don't be trying to kiss any vampires afterward, since garlic gives this pizza a kick! Add a soft-cooked egg on top, and you have a perfect vegetarian lunch or dinner.

Spinach, Kale, and Garlic Pizza - with Kale Pesto recipe

You can make this pizza using store-bought pizza dough, or make a batch of pizza dough at home ahead of time. (I hope to have a pizza dough tutorial up soon, I have a dear friend who is a "master pizza-man"- I have learned quite a few lessons from him.)

Some tips to making pizzas at home:
  • Go ahead and get yourself a pizza stone and a pizza peel. I found mine for about $15 each. They are a worthwhile investment for making pizzas, baguettes, or other crusty artisanal breads at home.
  • Use a hot oven. To get that authentic pizzeria crust, I crank my oven to 450-475. Make sure to place your pizza stone while the oven is cold to prevent cracking. Don't remove it from the oven until completely cooled. (I leave mine in overnight just to be safe.)
  • Prepare your dough ahead of time: Most pizza dough recipes can be made up to 2 days in advance and left to slowly rise in your refrigerator. It will result in a more tender, flavorful crust.
  • Mise en place! Just a fancy word for get organized. Set out your sauce, cheese and toppings so you can have a pizza factory. When we have pizza nights, I like to make three or four pizzas and let my family join in on the fun of assembling them. I put vegetable toppings on one large plate and meat toppings on another, that way you can mix or match and find new flavor combinations.
  • Balance is key: Don't overload your pizza with toppings. It will take longer to cook, resulting in a soggy crust.
  • Think outside the box. Feel free to "chef" it up at home! Some of my favorite pizzas have been complete originals when it comes to topping them.

Spinach, Kale, and Garlic Pizza
Makes one 12" pizza

Ingredients:
  • Pizza dough, homemade is best
  • Fresh mozzarella cheese-sliced and pressed between paper towels
  • Olive oil
  • 2 cloves garlic, sliced thin
  • 2-3 cups baby spinach/baby kale mix (or equal parts of each)
  • Parmesan cheese
  • Basil-Kale Pesto, see below, or substitute in your favorite pesto
  • eggs, optional

Directions:
  1. Heat your oven. Make sure that it is really hot so you don't lose a lot of your heat when transferring your pizza into the oven.
  2. Stretch your dough into a disk, leaving a bit of a border around the outside. I always hand stretch it, so if it isn't a perfect circle, don't worry!
  3. Heat a sauté pan over medium-high heat. Add a tablespoon of olive oil and the sliced garlic, let sweat for 30 seconds, or until fragrant. Add your spinach and kale, and let wilt down. Remove from heat.
  4. Spread a layer of pesto on the dough, then top with the sliced mozzarella.
  5. Squeeze out any moisture out of the spinach/kale/garlic, then evenly top your pizza.
  6. Grate a bit of parmesan over top, then bake until the crust is browned (10-15 minutes)
  7. Top with soft-cooked eggs and a bit more fresh parmesan, and enjoy!
Printer Friendly Version


Basil-Kale Pesto
Makes about 2 cups

 
Ingredients:
  • 1 clove garlic
  • 1 Tbsp. lemon zest
  • 1/2 cup pine nuts
  • 1 cup packed basil leaves
  • 1 cup kale, ribs removed
  • Olive oil
  • Salt

You can make a huge batch of this at the end of summer, and store in your freezer in zip-top bags to have home-made pesto year round.

Directions:
  1. Mince the garlic in the food processor with a pinch of salt.
  2. Add the lemon zest and pine nuts, basil and kale; pulse until ground into a paste. 
  3. While the machine is running, drizzle olive oil in until desired consistency.
  4. Season to taste with salt.
Printer Friendly Version

Monday, March 17, 2014

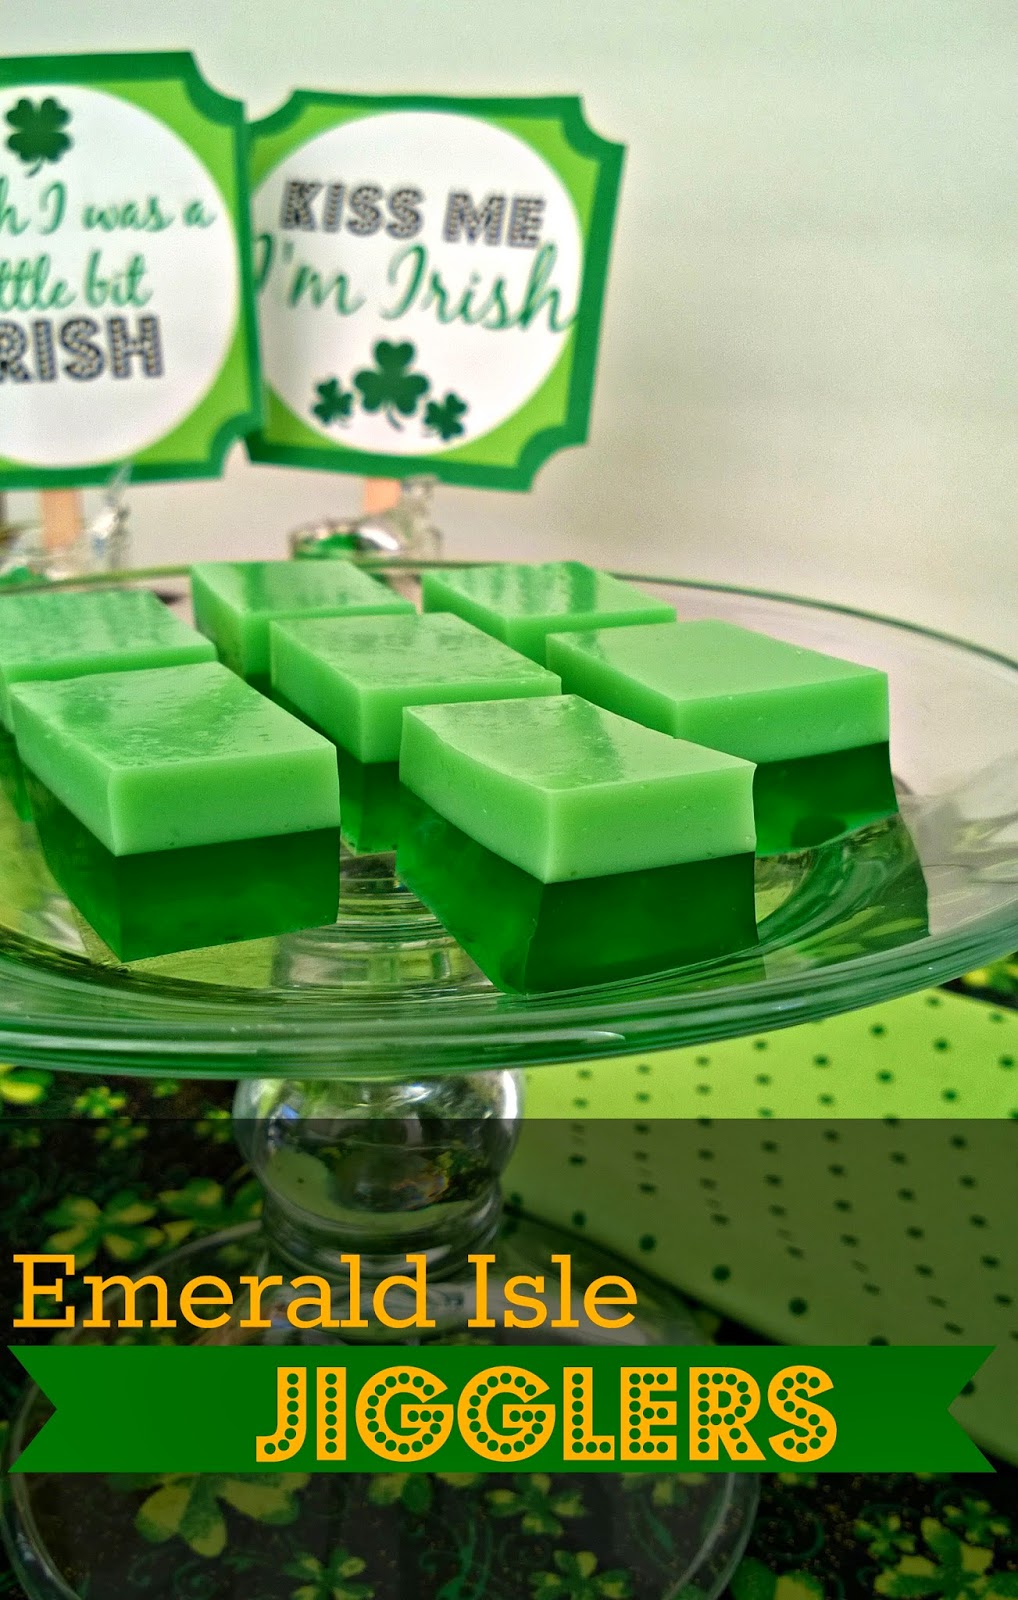
Emerald Isle Jigglers

Jello is definitely a treat for my children, since I try not to make it often. I think these Emerald Isle Jigglers are the perfect little way to celebrate St. Paddy's Day, and they couldn't be simpler.
 

Emerald Isle (Lime Jello) Jigglers
Makes one 9"x13" pan

You Will Need: 
3 large (6-oz) packets of lime Jello
1 1/4 cup sweetened condensed milk
Boiling water
Cooking spray
9x13 pan

This is a two-step process, but each layer is equally simple. The first layer is lime Jello Jigglers. Let it set and add a creamy Jello layer with the addition of condensed milk. This was such an easy dessert, my two-year old helped make the first layer before we put him down for bed. I finished the second layer before I went to bed and let it set up in the fridge overnight. (Hence no pictures of the step-by-step process, but it's so easy, you probably don't need them!)

For the bottom layer: Add 2 packets to 2 1/2 cups of boiling water. Stir and let dissolve for 3 minutes. Spray your 9x13 with cooking spray, then carefully pour your Jello in. Pop any bubbles with a toothpick and place in your fridge (uncovered) to set up for 1-2 hours.

For the top layer: Add 1 packet to 1 1/4 cup boiling water. Stir and let dissolve. Pour in 1 1/4 cup of sweetened condensed milk (I eyeballed it from a 14-oz can). Stir gently to combine. Slowly pour on top of the first layer, popping any bubbles. Return to fridge and let set 4-5 hours, or until really firm.

To serve, set your pan onto a hot towel for a few minutes, and slice with a sharp knife. Alternatively, you can cut with festive cookie cutters for even more St. Patrick's day cheer!